9 Tips for Optimizing a Production Environment
React + Node + Heroku Web App
🖼 Some context
I have been working in a simple "React + Node Web App" as a portfolio and a way to apply best web development practices. Its name is Cooking with Amateurs, and it displays a series of recipes I cooked with my friends during the 2020 quarantine.
Today I will be sharing some tips I found while learning how to improve the performance of this app in its Production Environment
1. 📖 Actually reading Webpack Docs
Webpack Documentation about configuring a Production Environment is quite complete, so it's a great place to start.
Basically, they recommend using the webpack-merge tool to be able to define different webpack configuration files: one for dev, another for prod, and a common file for both environments common configurations, in order to respect DRY.
Webpack configuration is a big world to explore on its own, and generally, most projects created with create-react-app just use the default configuration: but I think you can learn a lot by doing some custom optimizations in your app.
2. ✍ Taking advantage of Node Environment Variables (process.env.NODE_ENV)
I was able to remove duplicated code thanks to that. Instead of hardcoding certain data, it's more convenient to pass it using Node Environment Variables.
My Production Deployment Platform of choice, Heroku, allows you to define "Config Vars", which can be accessed as Node Env Vars. That was convenient for defining the Database URL for example.
3. 🤫 Keep your secrets secret
Of course, any security-related data from the Production configuration should not be committed into your code repository. In my case, I removed the URL to the Production Database and it will be only available as a "Config Var" in Heroku as explained in the previous point.
4. 🔍 Learning about your Deployment Platform
I noticed an "Installing Cypress" on the logs... why does a Production build need a Functional Testing Library for? Cypress was only on my devDependencies, yet, it appeared on Heroku logs.
I didn't know that Heroku's default process on Node.js apps is to install both dependencies and devDependencies from the package.json, and then prune/uninstall the devDependencies.
Luckily 😊, you can configure Heroku to avoid installing devDependencies altogether, using these "Config Vars:
NPM_CONFIG_PRODUCTION = true
YARN_PRODUCTION = true
I realized I haven't checked which dependencies are actually needed in the Production environment 😅, so I decided to start testing moving dependencies around and using npm install --production to make sure that only dependencies were installed on my local test build and then running my App.
5. 🕵️♀️Checking the results of your optimizations
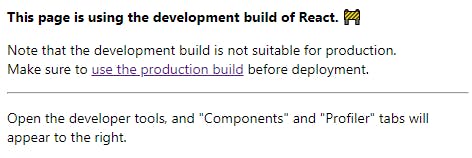
How to check if React Environments are configured properly? A quick way of doing that is to use React Tools Browser Extension. In general, I highly recommend using that tool for any React project.
This will be displayed by that Extension if you are in a Development Environment:

This will be displayed in a Production Environment:

Just using the correct environments will improve your app performance a lot 🤘:
Bundle.js size in Development Environment:

Bundle.js size in Production Environment:

Quite a difference, right 😁? I should be noticeable during the user experience.
6. ⚖ About bundle size
After the optimizations, I still got this warning:
The following asset(s) exceed the recommended size limit (244 KiB).
This can impact web performance.
Assets:
bundle.js (728 KiB)
In turn out, bundling all my App in a single .js file wasn't the best way to have a good "time until first-page load". I decided to follow React Suspense and lazy to manage a lazy load, and I configured Webpack to allow multiple bundle files 📚. I managed to get 6 separated bundle files, and the issue wasn't so dramatic anyway, but I still had a similar warning ❗:
WARNING in asset size limit: The following asset(s) exceed the recommended size limit (244 KiB).
This can impact web performance.
Assets:
  0.bundle.js (572 KiB)
I needed to know what was inside that 0.bundle.js: why it's so big? how can I split the code further and lazy load the components that weren't always needed?
I suspected that the issue was actually in my Components Library, Chemistry-UI (it's 575 KB in size ⚖, which seems close enough); so I would need to investigate and fix that on an independent task. Maybe I'm including too many dependencies or something heavy like an image.
It's a good idea to optimize your bundle by creating independent chunks for your vendors/dependencies.
7. ⬆ Updating Webpack
Webpack keeps improving and including nice new features by default. For example, changing from Webpack 4 to 5 I noticed that now the bundles include licenses files and they use a different hash by default.
8. 🧹 Keeping your root clean
I moved my multiple Webpack configuration files into their own folder.
I created a folder for dev_tools too, where I for example store the hack I use to "link" my local build of ChemistryUI with my local CookingWithAmateurs.
9. ⌚ Deploy in Production often
Be aware: even if you simulate the Production Environment in your local machine, it won't be a perfect simulation. For example, a typical case is that you might be developing on a Windows OS, but generally Remote Servers use Linux.
In my case, using __dirname and trying to "replace" the last segment of the path broke my Heroku environment. I fixed it using process.cwd() instead, which always returns the root, which I needed for my server and Webpack configurations.
Of course, I did so many changes to my app and I deployed them all together so I lost time looking for the commit that originated the bug so yeah, don't be like me 😅 deploy often and independently potentially breaking changes.
👋 Conclusion
Optimizing an App in Production can be hard 😅, and there's a lot to learn, but it's a good exercise and a great growth opportunity 💪. Even if your app is not really going to have very huge traffic, good practices should be always present from the start in case you need to scale in the future 🌟.
